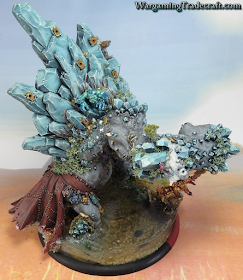
One of the parts of the Elemental King Project was that he's supposed to be covered in moss / grass. Originally, I was going to go overboard - if it was skin, it was going to be covered in moss. As he came together, my vision changed. I really liked how his skin turned out and didn't want to hide that. Instead, I decided to have the moss growing from the stone outcroppings, thicker where it met the skin.
The neat thing about an elemental, is I'm mixing my basing techniques with the actual body of a miniature. This creates a unique dynamic not often seen in miniatures.
Hobby Moss
I've worked with hobby moss before, but for terrain. It's great stuff that adds a realistic touch to whatever project you're working on.
I've worked with hobby moss before, but for terrain. It's great stuff that adds a realistic touch to whatever project you're working on.
Worth noting is that this moss is fine and small along the top and has a larger root system underneath. Similar to a bush with thicker stems that explode in to lots of smaller branches. This is great for terrain - glue the thicker base down and let the moss grow out.
This doesn't work for miniatures. Because of scale, you'll have to be selective about which parts of the moss you use - I found using tweezers to be the best way to tear off the clumps you want to use.

Testing Out Before Gluing


It's a big move to start gluing moss all over the Mountain King and I had to choose the right type. Some of my moss is beige, another is bright green, but I think the type I've picked is in line with the tone of the rest of the model.
Mossed
Now that he's covered, the moss is looking nice. Natural. Keeping it between and around the bases of the stones, it really gets the appearance that it's growing out of his skin.
If you're curious, I just used Super Glue. Thicker or gel is best, so it doesn't run all over your paint job.
Flowers - Natural Basing Supplies
Being a firm believer in using natural supplies when basing miniatures, I gathered some brush last summer from a local field. Obviously, large flowers are too big for us to use with miniatures; Look instead for field plants with their own tiny buds and blooms. When you look closely, they're basically flowers at the scale we need.
Varnish to Preserve
I varnished the whole model before adding any of the gel effects or adding this basing.
Some plants dry out once they're picked. These held together really well, but I still wanted to preserve them to some degree. The solution I came up with, that seems to have worked, is to pick the plants up with tweezers and dip them briefly in varnish. Wait for them to dry, then continue gluing.
Applying the Flowers
I wanted to build a little pond around this water elemental, so I started by building flowers up around him, then continued down his back along the edge where the water would be falling down.
Creating the Pond
Through multiple layers, I filled the larger pools with pouring medium, while allowing it to run through the cracks and down to pools below. (You can see it below - it looks milky white while wet and dries clear.) Pouring medium loses volume and shrinks as it dries, so I have to keep topping up the pools with multiple layers until they're full.
At the same time, I'm running water down his back and creating small water-falls off the stones jutting out.
Tools
To create such fine control over the pouring medium, I've used small metal tools. One type has a little scoop on the end, the other just comes to the point. The scoop lets me fill the tiny pools without spilling all over, while the pick lets me "scoop" tiny droplets of gel and dot it down his body to create the streams.
The local surplus store carries a great selection of these types of tools and cheap!
 |
| Not my photo, (source) but the same tools I have. |
Mushroom, Mushroom
I also have all these little mushroom caps (Also from the fake plants available at hobby stores.)
To be mushroom-like, I tried gluing them exclusively to cracks, crevices and anywhere darker.
Final Photos
Below you can see a photo of him covered in the terrain and the dried water effects.
 | Take a look at my entire Hordebloods project. Here you will find each model broken down into links showing each step: Concept, Works in Progress, (for both sculpting and painting) and final photos |


I love the little details like the flowers and mushrooms. Really helps offset the hard stone and crystal to make him feel more alive and part of the world. Amazing work on him!
ReplyDeleteThanks! I love how using real supplies makes such a big difference in causing miniatures to become believable.
DeleteThis is absolutely amazing, and your use of natural materials puts him over the top! Def stellar work here!
ReplyDelete