- Different Types of Surfaces / Paper / Absorbency
What you can do is find a smooth surface to paint on. Poster board is a little large and cumbersome, but will work and it’s cheap. (Dollar stores usually have it) If you go to an art store (and possibly some craft/hobby stores) you can find sketching pads, some of which are low-porous surfaces. You’ll be able to feel it; they’re very smooth, almost like a plastic but matte - not glossy. You could even use cheap printer photo paper.
- Types of paint / ink
Ink’s also great practice paint. While thinner than even airbrush paint, it will be a stronger contrast on your paper and flows really well. This will help you practice strokes and differences in pressure, paint flow and the distance from the surface. Even though the ink is thin, it's still has a strong colour - using thinners instead of water has a similar effect.
- Tinting
For example:
- If I have a black surface that I want to paint green
- I spray on a thin layer of green that covers everything but is so thin (clear) enough that it still looks black, but with a green sheen.
- Then I add another layer, and another and another and so on until I reach the colour of green I’m after.
- The green slowly builds up as I add each layer.
- As I’m adding these layers, I start to apply uneven coats of paint so that I’m spraying more paint on the areas where light would hit and less in the recesses and/or other angles.
- This of course is different depending on what you’re painting. Base coating and large area painting can be done with heavier coats – detail is the trickier part.
- Because these layers are so thin, they dry quickly.
This doesn't just apply to "dark" colours, but any colour - white, yellow, green, etc, can all be layered to strengthen the colour with every stroke.
- Blending and Shading
When you’re highlighting, lots of thin layers of light paints will gradually lighten the surface. The same thing goes when shading – if you want a little more shadow, a few soft bursts of a dark paint will add that deep colour you’re after.
- Exercises
I've created a few sheets to help practice with your airbrush. You can download and view the PDF here:
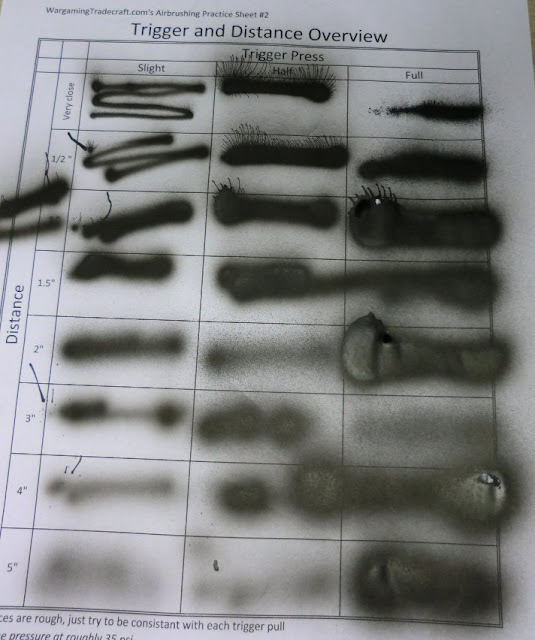
The following are some of the tests I did - not all of them are perfect, so don't be surprised if ours look nothing alike. This should just give you some examples of what the airbrush can do.
In the following two images, the CONSTANT is I used 35 psi for each box. I varied the distance from the paper and how much I pulled back on the trigger.
In the next two images, I tried to keep my distance from the paper CONSTANT, while seeing how different pressures and trigger pulls interacted.
- What to Learn from these Examples
If you payed attention to the above examples, you should notice a few things:
- Area sprayed is... (size of your spray)
- ...larger the more you pull the trigger back. (Using more paint)
- ...larger the further you move the airbrush from the target.
- ...not really affected by the PSI you work at.
- The line drawn is... (amount of overlap or sprayed / misty look)
- ...cleaner the closer to the target the airbrush is.
- ...cleaner the higher PSI (pressure) you use.
- ...cleaner the less you pull the trigger back. (Using less paint)
Keep in mind that there isn't a "right" or a "wrong" way to airbrush. Depending on what you're painting, you'll want a larger / smaller spray pattern or you'll want a more misty look because it overlaps better.
- Over Spray
Whether practicing or painting for real, clean up your over-spray right away, or put down a covering over your work area. The biggest thing is don't have any models nearby you could accidently end up painting!
 Take a look at the Wargaming Tradecraft Techniques Page for links to the entire Airbrushing series and other tips, tutorials and information.


No comments :
Post a Comment
Please keep all comments civil and language appropriate for a child-safe environment.