It's inexpensive, handy and can fit basically any size of airbrush.
Here's where I'm planning on mounting the airbrush.
The following are most of the tools needed for this project:
Metal strapping comes in handy from time to time. As you can see in the higher up photo, it made a holder for my syringe. (Wishing I'd bought the galvanized stuff, since all the moisture in the apartment has since rusted it through) Next up is a pair of tin snips - strong scissors designed to cut metal. Finally, some screws and a screwdriver. (More efficient and invented by a Canadian. Never widely adopted because he refused license requests.)
The other tool I use is a larger set of needle-nose pliers. This lets me get clean edges when bending the strapping.
Then I use the tin snips to cut them up.
 Both of these get screwed against the shelf. Because the screws aren't very long, I don't need to pre-drill these.
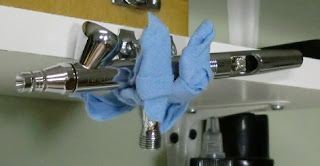
The final product!
You can see I've wrapped these in some shop towels just to avoid scratches.
 Take a look at the Wargaming Tradecraft Techniques Page for links to the entire Airbrushing series and other tips, tutorials and information.


A pretty great idea. Couldn't you use some kind of a rubber instead of paper? Or some kind of latex maybe?
ReplyDeleteYup, anything to smooth out the edges will work so you don't scratch the finish. It's just what I have handy.
ReplyDeleteGreat tip, and extremely budget-friendly if you already have something suitable lying around. Any estimate on what the metal strapping would cost?
ReplyDeletePretty cheap actually. $7 for 25 feet at Home Hardware in Canada. I think around $10 for the galvanized stuff. (water proof)
ReplyDeleteAwesome suggestion, thank you.
ReplyDelete